VPN on Kali Linux is strange enough not installed and enabled by default which leaves you with a greyed out VPN option panel and a rather difficult, or at least a not straight forward, set-up process if you don’t know how to install VPN. VPN stands for Virtual Private Network and extends your private network over the internet which will cloak your IP address, bypass censorship and encrypt your network traffic. In this tutorial we will install the necessary packages and setup the popular Golden Frog VyprVPN service in Kali Linux.
I’m using VyprVPN from Golden Frog as VPN service for a couple months now on public wireless networks and in foreign countries for example. Their VPN service is fast, reliable and there are many servers/countries to choose from (50+ servers and 200,000 IP addresses). There’s an app for all platforms, including Ios, Android, Windows, Mac and a VyprVPN router app to secure your entire home network. Golden Frog claims to not keep logs for their VPN services and they have great apps available for managing VPN connections.
A new and updated tutorial on installing VPN on Kali Linux 2016 rolling edition is available now.
If you sign up using one of the following links you can get a discount:
Or the following offer with 25% off for annual accounts:
There is also a 3 day free test period available so you can try their services before you buy them.
Why use VPN?
There are several reasons why you would want to use a VPN service:
Installing VPN on Kali Linux
Open a terminal and use the following command to install the necessary packages:
apt-get install network-manager-openvpn-gnome network-manager-pptp network-manager-pptp-gnome network-manager-strongswan network-manager-vpnc network-manager-vpnc-gnome
Type y and enter when being asked to install the packages.

Now we need to download the CA certificate from VyprVPN using the following command (one command, ignore white space):
sudo wget -O /etc/openvpn/ca.vyprvpn.com.crt
Go to your network manager, go to the VPN tab and click “Add”:

Select OpenVPN as connection type.
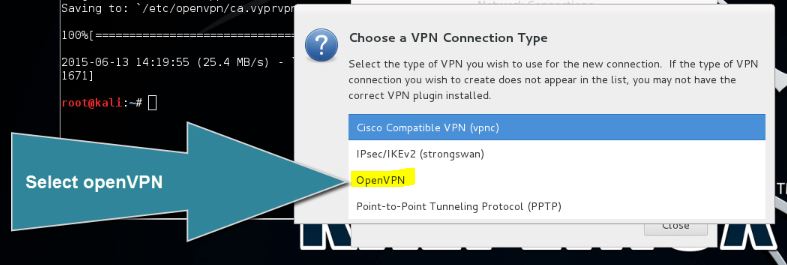
And click create:

Enter the following information:

Click the browse file button to select the CA certificate we downloaded earlier.

The file was downloaded to the following location:
/etc/openvpn/ca.vyprvpn.com.crt

Click the save button and we are ready to go!

You can start your VPN connection by going to the network manager and select the connection we’ve just added.
VPN on Kali Linux Video Tutorial
I’m using VyprVPN from Golden Frog as VPN service for a couple months now on public wireless networks and in foreign countries for example. Their VPN service is fast, reliable and there are many servers/countries to choose from (50+ servers and 200,000 IP addresses). There’s an app for all platforms, including Ios, Android, Windows, Mac and a VyprVPN router app to secure your entire home network. Golden Frog claims to not keep logs for their VPN services and they have great apps available for managing VPN connections.
A new and updated tutorial on installing VPN on Kali Linux 2016 rolling edition is available now.
If you sign up using one of the following links you can get a discount:
Or the following offer with 25% off for annual accounts:
There is also a 3 day free test period available so you can try their services before you buy them.
Why use VPN?
There are several reasons why you would want to use a VPN service:
- VPN cloaks your IP Address and location so you will be anonymous.
- Avoid internet censorship, firewalls and access region restricted content.
- Encrypt your network traffic (on public Wifi for example).
- To hide your identity.
Installing VPN on Kali Linux
Open a terminal and use the following command to install the necessary packages:
apt-get install network-manager-openvpn-gnome network-manager-pptp network-manager-pptp-gnome network-manager-strongswan network-manager-vpnc network-manager-vpnc-gnome
Type y and enter when being asked to install the packages.

Now we need to download the CA certificate from VyprVPN using the following command (one command, ignore white space):
sudo wget -O /etc/openvpn/ca.vyprvpn.com.crt
Go to your network manager, go to the VPN tab and click “Add”:

Select OpenVPN as connection type.

And click create:

Enter the following information:
- Connection name
- Gateway (Different gateways are available from the website)
- Set authentication type to password
- Username and password

Click the browse file button to select the CA certificate we downloaded earlier.

The file was downloaded to the following location:
/etc/openvpn/ca.vyprvpn.com.crt

Click the save button and we are ready to go!

You can start your VPN connection by going to the network manager and select the connection we’ve just added.
VPN on Kali Linux Video Tutorial


